
Pouring a concrete slab starts with stable ground, secure forms, and the right concrete mix. This guide explains how to pour a concrete slab by preparing the base, positioning reinforcement, placing and leveling concrete, finishing the surface, planning joints, and protecting the slab as it cures.
For commercial work in Colorado Springs, slab requirements depend on the expected loads, site conditions, and approved plans. Elite Surface Infrastructure provides concrete flatwork for commercial and public projects.
What to Know Before Starting a Concrete Slab Project
Start by deciding what the slab will support. A pedestrian walkway, warehouse floor, and equipment pad may need different thicknesses, reinforcement, and concrete strengths. An engineer should specify the design when a slab carries structural or heavy loads.
Measure the proposed area and evaluate drainage, soil stability, and access for concrete trucks. Before digging, arrange utility locating through 811 and find out which permits and inspections apply. The City of Colorado Springs requires a concrete permit for specified concrete work in the public right-of-way, as explained in its concrete permit guidance. Other projects can have different approval requirements.
Tools and Materials Required for the Project
Concrete work moves quickly once placement begins, so gather the equipment before delivery. The list changes with slab size and access, but most projects need:
- Site preparation: Shovels, rake, stakes, string line, measuring tape, and excavation equipment.
- Base work: Specified gravel or crushed stone, plate compactor or roller, and a level or laser level.
- Forms: Form boards, stakes, screws or nails, and braces.
- Reinforcement: Rebar or welded wire mesh, tie wire, cutters, and support chairs, if specified.
- Placement: Approved concrete mix, delivery chute, wheelbarrows, or a pump when needed.
- Finishing: Screed, bull float, hand float, edger, broom, and joint-cutting tools.
- Protection: Curing compound or coverings and suitable personal protective equipment.
Safety Precautions Before and During Concrete Placement
Keep wet concrete away from bare skin and eyes. Cement is alkaline and can cause serious burns after prolonged contact. Wear suitable water-resistant gloves, eye protection, long clothing, and boots that prevent concrete from entering.
OSHA’s construction hazard guidance identifies cement burns, moving vehicles, poor footing, and exposed equipment as construction risks. Assign a spotter when trucks move near workers and keep the placement route clear of cords, tools, and debris.
Cap or guard exposed reinforcement where it presents an impalement hazard. Workers using saws or powered tools need the correct guards and dust controls. Stop work if ground, forms, equipment, or weather conditions make the job unsafe.
The Concrete Slab Installation Process
Concrete slab installation follows nine connected steps. Each stage must meet the design requirements before the crew moves forward.
Step 1. Prepare and Grade the Site
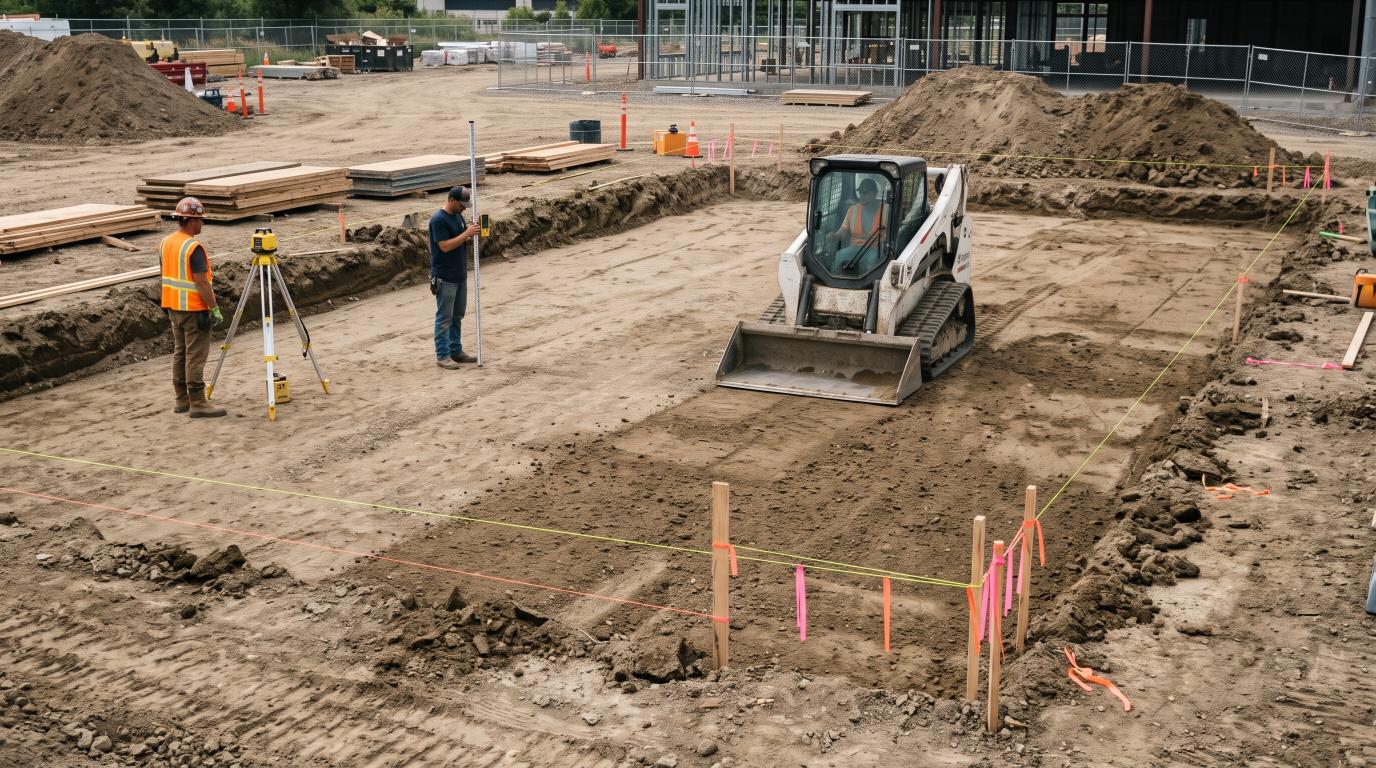
Remove vegetation, roots, debris, and soil that cannot support the slab. Mark the perimeter with stakes and string, then check the length, width, and corners. Excavate enough for the specified base depth and concrete thickness. Grade the exposed soil, called the subgrade, to the planned elevations. Set any required slope so rainwater drains toward the correct outlet rather than collecting beside a building. Check for soft spots before adding the base. Unstable material may need to be removed or treated under the project specifications.
Step 2. Build and Compact the Gravel Base
Spread the specified aggregate over the prepared subgrade. This compacted layer is the subbase. It provides more even support and helps the crew maintain the required slab elevation.
Place aggregate in layers the compaction equipment can handle. Compact each layer rather than rolling only the top of a deep pile. Follow any required field compaction tests. Where the design calls for a vapor retarder, place and seal it in the specified location.
Step 3. Set and Secure the Concrete Forms
Install form boards around the planned perimeter and fasten them to stakes. Add braces at corners and long runs so the boards stay in position when concrete pushes against them. Check dimensions and measure the diagonals of rectangular layouts to confirm that the corners are square. Verify the top elevations, including any planned drainage slope. Inspect every connection before placement. Repair loose fasteners or gaps before fresh concrete arrives.
Step 4. Install Rebar or Wire Mesh Reinforcement
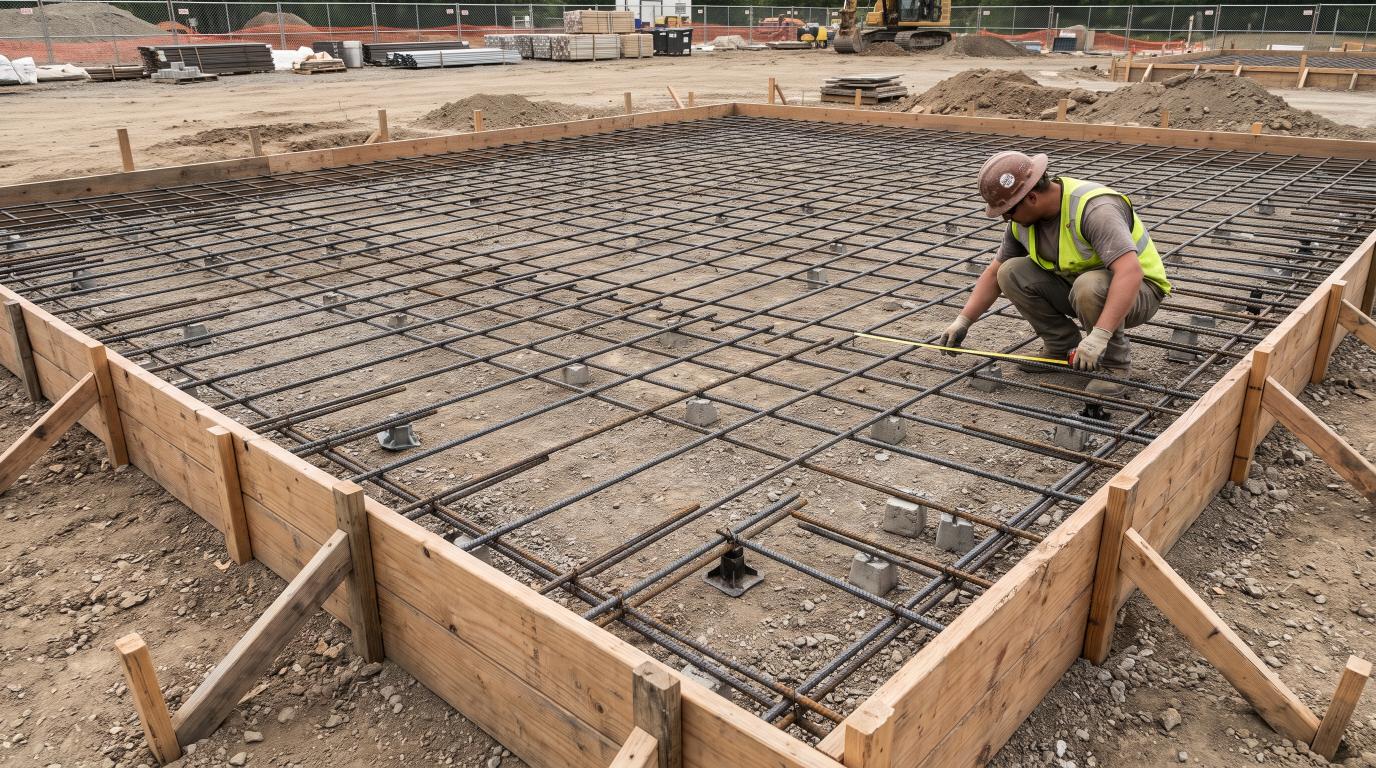
Install the reinforcement required by the approved plans. Rebar uses individual steel bars placed in a pattern, while welded wire mesh comes as a connected grid. Neither should be substituted for the other without design approval.
Set reinforcement on proper chairs so it stays at the specified height and has the required concrete cover, meaning the distance from steel to the slab surface or edge. Steel left against the ground cannot provide the intended placement. Tie connections and overlaps as specified, and check the supports before the pour.
Step 5. Mix and Pour the Concrete
Calculate the volume before delivery: multiply length by width by thickness, all in feet, then divide by 27 for cubic yards. For example, a 12 ft by 12 ft slab that is 4 inches thick needs about 1.78 cubic yards, before allowance for waste and uneven ground. Use the approved concrete mix. For exterior surfaces exposed to freezing and thawing, the design may call for air-entrained concrete.
Follow the required water-to-mix ratio for bagged materials, or coordinate ready-mix delivery and discharge for larger work. Place concrete steadily, spreading it close to its final position. Consolidate it by the specified method so it fills around reinforcement and against forms without leaving voids. A 2025 Cal Poly construction report by Tyler Nielsen shows why crews must coordinate grading, forms, ready-mix supply, and pumping before work begins.
Step 6. Screed and Level the Concrete
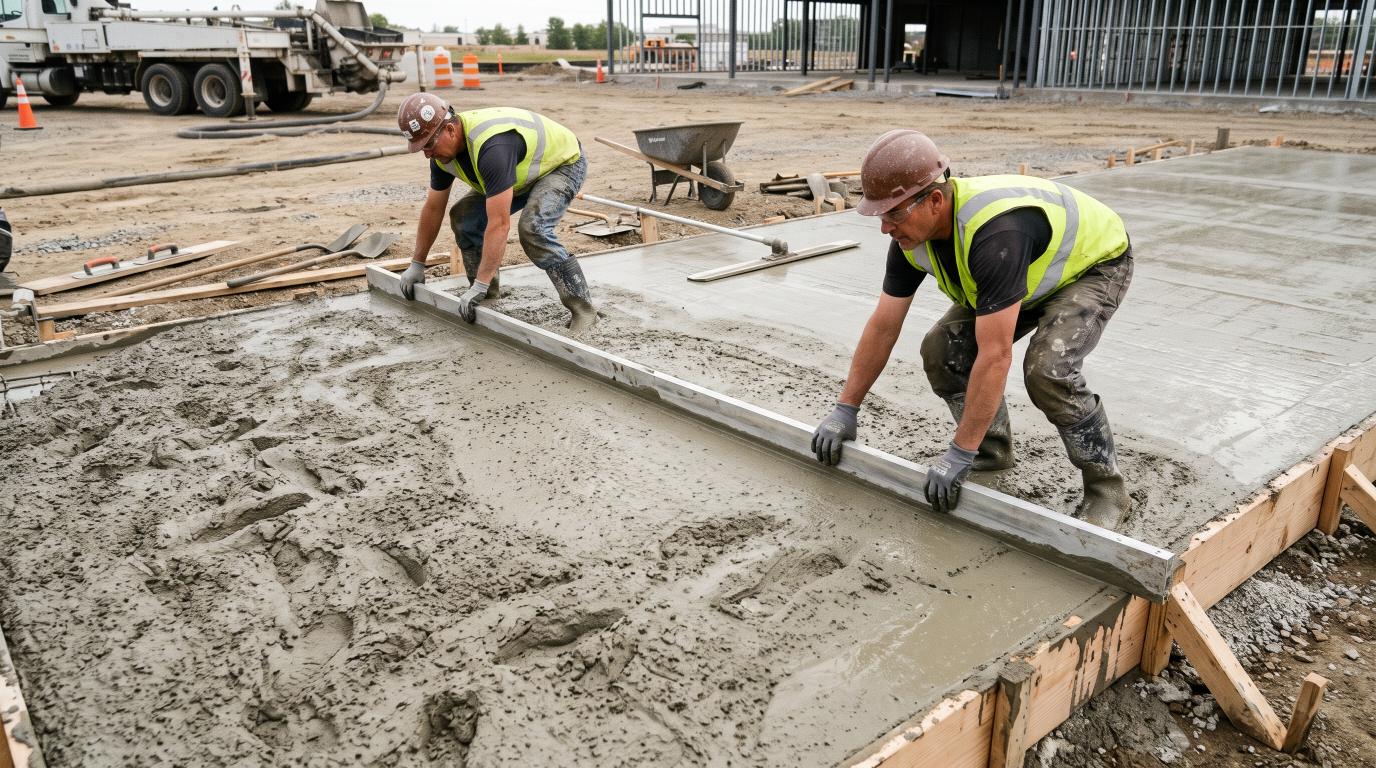
Pull a straight screed or mechanical screed across the forms or prepared guides. The goal is to bring the fresh surface to the required elevation while removing excess material. Fill low spots with fresh concrete and screed them again. Use a bull float after screeding to remove ridges and lightly smooth the top. Do not work standing water into the surface. If bleed water rises, allow it to disappear before later finishing.
Step 7. Float and Finish the Surface
Begin final finishing when the concrete has firmed enough and bleed water is no longer visible. Finishing too early can trap water near the surface, leading to a weak top layer. Use a hand float where needed and round exposed edges with an edger.
Select the surface texture for its use: a broom finish provides traction on many outdoor areas, while a smoother finish may suit specified indoor floors. Do not repeatedly trowel the surface just to make it shinier.
Step 8. Create Control Joints and Install Isolation Joints
Control joints encourage shrinkage cracks to form along planned lines. Isolation joints separate the slab from fixed features such as columns or walls so the parts can move independently. Follow the approved joint layout. Tool joints into fresh concrete or saw-cut them at the correct time.
The American Concrete Institute explains in its saw-cutting guidance that cuts must be early enough to limit random cracks but late enough to avoid tearing the edges. Conventional cuts are generally about one-quarter of slab depth, unless the design or cutting method requires otherwise.
Step 9. Cure and Protect the Concrete
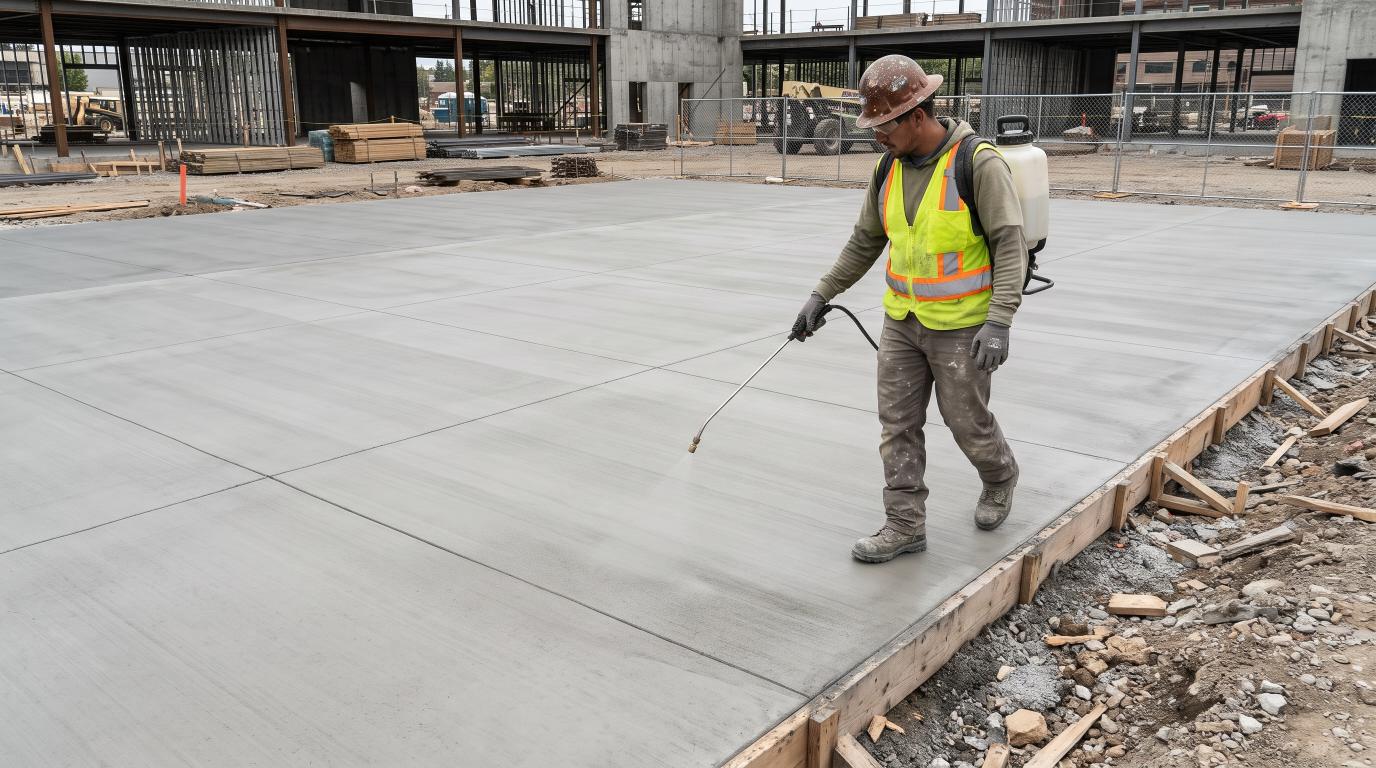
Start the specified curing method as soon as the surface is ready. Curing holds suitable moisture and temperature conditions while cement reacts with water and concrete develops strength. Depending on the project, use curing compound, moisture-retaining coverings, or another approved method.
Protect fresh work from heavy rain, rapid drying, accidental traffic, and freezing. Cold-weather plans may need insulating blankets or heated enclosures; warm, windy conditions may need extra protection against moisture loss. The American Concrete Institute’s 2026 curing guide covers curing methods for slabs on ground and protection in hot and cold weather.
When Can You Remove Concrete Forms and Use the Slab?
Form removal and slab loading follow different requirements. Side forms may be removable once the concrete can hold its edges without damage, but that does not mean the slab is ready for vehicles or heavy equipment.
Light foot traffic may be allowed earlier than full service loading, depending on the mix, weather, curing, and site controls. Never use a fixed waiting time as a substitute for project instructions. Structural supports must not be removed without the required strength verification and approval. Ask the contractor or engineer to confirm release times for walking, storing materials, driving, and other loads.
How to Prevent Formwork Failure During a Concrete Pour
Prevent formwork failure by checking stakes, braces, fasteners, and boards before placing concrete. Fresh concrete can push forms outward, so weak corners and loose connections deserve special attention. Watch the perimeter throughout placement. Bowing boards, spreading joints, leaning stakes, or sudden leakage can signal trouble.
A 2022 research paper in Buildings examines formwork, reinforcement, construction loads, and safety risks. If a form starts moving, stop placement, clear the affected area, and have a qualified person assess it. Do not try to hold the form with your hands.
How to Check Concrete Quality Before Placement
Before concrete is discharged, compare the ready-mix delivery ticket with the approved project specifications. Check the mix identification, specified strength, ordered quantity, and required admixtures. Confirm that the delivered concrete matches the mix approved for the project.
Depending on the specifications, a qualified technician may perform fresh-concrete tests. A slump test measures consistency and workability, while air-content and temperature tests help verify other properties of the delivered mix. These checks help determine whether the concrete meets the project’s acceptance requirements.
Do not add water without authorization. Additional water can change the concrete’s properties and affect its performance. The National Ready Mixed Concrete Association explains in its concrete materials guidance that ASTM C94 permits certain jobsite adjustments within specified limits and with proper documentation. Record approved adjustments on the delivery ticket.
How to Inspect a Concrete Slab After Placement
After the slab has hardened enough for safe inspection, compare the finished work with the approved drawings and project specifications. Check the surface, edges, joints, and drainage characteristics. Record visible defects and their locations before deciding whether repairs are necessary.
Concrete Slab Inspection Checklist
|
What to Inspect |
Possible Problem |
What to Check or Do |
|
Surface cracks |
Shrinkage, settlement, or movement | Record the crack’s width, length, and location. Have significant cracks assessed. |
| Edges and corners | Chipped or broken concrete |
Check the extent of damage and determine whether repairs are needed. |
|
Surface drainage |
Water collecting in low areas | Compare surface elevations with the approved drainage plan. |
| Control joints | Missing, damaged, or misplaced joints |
Verify joint locations and appearance against project specifications. |
|
Surface finish |
Rough patches, scaling, or uneven texture | Document affected areas and check whether the finish meets project requirements. |
| Structural warning signs | Settlement, exposed reinforcement, or deep damage |
Request a professional assessment. Visual inspection alone cannot confirm concrete strength. |
Not every surface mark indicates a structural problem. However, deep cracks, noticeable settlement, exposed reinforcement, or significant changes in slab elevation should be evaluated by a qualified professional.
How Concrete Strength Is Verified
Concrete strength is commonly verified by testing cylinders made from fresh samples. Trained technicians prepare and cure the specimens, and a laboratory compresses them until they fail. Seven-day results can show early strength development. Twenty-eight-day results are commonly used for acceptance when the specified test age is 28 days.
The National Ready Mixed Concrete Association’s compressive strength testing guide explains cylinder testing under ASTM C31 and ASTM C39 and how results are compared with specified strength.
If results fall short, the engineer reviews the test records and determines whether further investigation is needed. One low cylinder result alone does not always mean the installed slab must be replaced.
Plan Your Commercial Concrete Project With Elite Surface Infrastructure
A commercial slab must meet the project’s requirements for traffic, drainage, loading, and surface finish. Good planning also helps coordinate access, deliveries, crews, and inspections before placement begins.
Elite Surface Infrastructure provides concrete flatwork and related civil construction services for commercial and public projects in Colorado Springs.
Planning a commercial concrete project? Contact us to discuss the scope, location, and schedule. Share the available plans and intended use so the team can review the work and provide an estimate.
Conclusion
Pouring a concrete slab requires careful planning and attention at every stage. Proper site preparation, base compaction, reinforcement placement, concrete handling, finishing, jointing, and curing all contribute to the finished slab’s performance.
Quality checks and strength testing also help confirm whether the work meets the project requirements. For commercial slabs and heavy-load applications, follow approved construction plans and involve qualified professionals to address design, placement, and inspection requirements.
Frequently Asked Questions
Can You Pour a Concrete Slab Directly Against an Existing Foundation?
Yes, but an isolation joint is usually needed between the new slab and the existing foundation. This joint allows movement without putting unnecessary pressure on the foundation. The correct connection depends on the slab design and structural requirements.
Can You Pour a Concrete Slab Over an Existing Concrete Slab?
Yes, new concrete can be poured over an existing slab if the original surface is stable and in good condition. The old slab must be properly prepared, and the new concrete needs adequate thickness. Major cracks or settlement may require repairs or replacement first.
What Happens If It Rains Shortly After a Concrete Pour?
Rain can damage fresh concrete before the surface has set. Heavy rainfall may wash away cement paste, leave marks, or weaken the finish. Cover the slab when rain is expected and inspect the surface for damage afterward.
Can a Concrete Slab Be Poured on Uneven Ground?
Yes, but the ground must be properly graded and compacted before pouring. Uneven soil can cause inconsistent slab thickness and poor support. Prepare the base according to the required elevations, drainage conditions, and project specifications.
How Long Should You Wait Before Parking a Vehicle on a New Concrete Slab?
Wait about 7 days or longer before parking a standard passenger vehicle on a typical new concrete slab, but only with the contractor’s approval. Heavy vehicles may require a longer waiting period. The safe timing depends on concrete strength, weather, curing, and the slab’s design.
Can You Pour a Concrete Slab Without Excavating the Soil?
Yes, if the existing ground provides adequate support, drainage, and space for the required slab thickness. Excavation is necessary when unsuitable soil must be removed or additional depth is needed for the gravel base and concrete.